|
|
|
LESSSON 5: BUTTONS
| LESSON 1 | LESSON 2 | LESSON 3 | LESSON 4 | LESSON 5 | LESSON 6 | LESSON 7 |
Objectives:When you
have finished this lesson, you will understand:
o How you can create buttons
o You can also manipulate butons
STOP: To use this note , Please Open Flash 5> Click Help > Click Lessons> Click 06 Buttons
Understand Buttons
 Buttons
let viewers interact with Flash movies. For example, the Next button in
this movie changes the Stage by advancing the playhead to the next scene.
To create a button, you create images for the Up, Over, and Down states of the
button. Generally, these images are slight variations of one image. In addition,
you also specify the area that triggers the button interaction, called the Hit
state. When the pointer clicks or rolls over a button, Flash displays the appropriate
image.
Creating a button
A button is a type of symbol with a special Timeline. You've learned to create
symbols in Lesson 2. The shape in the work area is an instance of a button symbol
for which you'll create different states. After the next step, the instructions
continue in the Symbol Editing window.
- Right-click (Windows) or choose Edit.
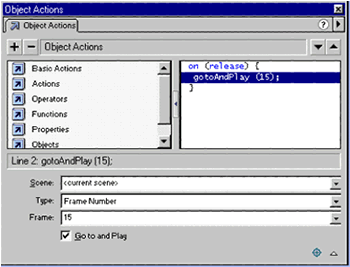
Now you'll make clicking the button advance the playhead to Frame 15 of the
scene. You'll do so by attaching an action to the button instance in the Object
Actions panel. Once the panel is open, you'll have to move it to continue reading
the steps.
 1.
Right-click (Windows) or and choose Actions.
The Timeline for a button
has three frames for the button states Up, Over, and Down. The Hit frame defines
the area of the button that responds to the mouse.
a. Select the second frame (labeled Over) in the Timeline and choose Insert
> Keyframe or press F6.
Flash copies the rectangle into the new keyframe.
 b.
Use the Paint Bucket tool to change the fill color of the button from blue to
green. You may want to click outside the button with the Arrow tool first to
deselect it.
c. Repeat this step to create a new keyframe for the Down state and change the
color to red.
d. Create a keyframe for the Hit frame. No changes are necessary.
e. Choose Edit > Edit Movie when you’re finished editing the symbol.
 2.
In the Object Actions panel click the Add (+) button and choose Basic Actions
> Go To from the pop-up menu.
3. Click the Type pop-up
menu and choose Frame Number.
4. Enter 15 in the Frame text box.Make sure Go To and Play is enabled.
5. Click the button to see it advance the playhead to Frame 15.
| LESSON 1 | LESSON 2 | LESSON 3 | LESSON 4 | LESSON 5 | LESSON 6 | LESSON 7 |
|
Note taken from Using Flash 5 Help ©2002 Webmaster:Lina Aisah Rahmat. YPM Kuala Lumpur |