|
|
|
LESSON 1: INTRODUCTION TO FLASH 5 AND ITS DRAWING TOOLS
| LESSON 1 | LESSON 2 | LESSON 3 | LESSON 4 | LESSON 5 | LESSON 6 | LESSON 7 |
OBJECTIVES
When you have finished this lesson, you will understand:
o What is Flash and the key parts of the Flash workspace
o how to use the Stage
o the role of frames, layers, and the Timeline in the construction of an animation
o how lines and shapes interact
o how the Magnifier tool helps by enlarging or reducing your view of an element
on the stage
o the basics of applying color in Flash
o the value of the Web-safe color palette
o the advantages of antialiased text
and you will have learned:
o how to draw with the Pencil tool and use the Pencil Tool modifiers
o how to select line mode, line color, line thickness, and line style
o how to select, move, rotate, and modify a drawing element
o how to select and apply color for a shape, fill, or line
o how to create and apply a linear gradient
o how to save a color set
o how to use the Paint Bucket and Brush tools and their modifiers
o how to use the Text tool to add text to a drawing
Animated images and Java applets are often used to create dynamic effects on Web pages.
The advantages of Flash are:
Macromedia writes: "In September 2000, NPD Research, the parent company of MediaMetrix, conducted a study to determine what percentage of Web browsers have Macromedia Flash preinstalled. The results show that 96.4% of Web users can experience Macromedia Flash content without having to download and install a player." Macromedia Shockwave Player is shipped with Windows 95, 98, MacOS, Internet Explorer CD, America Online, and Netscape Navigator.
If you do not have the Shockwave Player installed you can download it for free from Macromedia's site (200 K).
To create your own Flash movies you need to buy a Flash program. The latest version from Macromedia is Flash MX. If you do not have a Flash program, you can download a 30 days free trial version of Flash MX from Macromedia.
You will need Flash 5 to take this tutorial. If you do not have a copy of Flash 5, you can download the trial version by clicking here. After you have installed Flash, you should go through the lessons that are included in the program. Start Macromedia Flash, click Help in the menu and choose Lessons. These lessons will teach you the basics of Flash.
THE FLASH 5 WORKSPACE
Figure 1-1 shows the Flash 5 workspace. Depending on the other software you
use, Flash 5 might look familiar or disconcertingly new. In Flash, the open
workspace is called the Stage. The left half of the Menu bar is standard to
many Windows applications. The Drawing toolbar and the Layers might remind you
of tools you've used in draw and paint software. Unless you use Macromedia Director,
you haven't seen frames or the Timeline before-you'll use them for animation.

Figure 1-1
The Flash 4 workspace.
| The Stage: In the centre is the large white 'Stage'. This is the actual movie where you will place all the objects you want to include in it. | ||||
|
The Timeline: This is where you insert all the actions that happen in your movie so that they happen at the correct times. It is split up into frames. |
||||
|
Tool palette: This is where you will find all the tools for inserting objects and text into your animation. There are also four floating pallettes on the screen.
|
||||
| Tool modifiers: for the selected tool display below the Tool palette. You use modifiers to set tool options. |
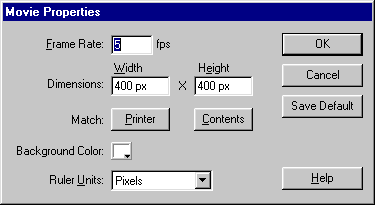
You start creating your movie by setting the Frame Rate, Dimensions, Background Color, and Ruler Units.
|
Frame Rate |
The speed of the movie |
|
Dimension |
The size of the Stage. |
|
Background Color |
The color of the Stage. |
|
Ruler Units |
The unit of measure the ruler displays. |
You set these properties in the Movie Properties dialog box.
To set the properties for the movie you are going to create:
LEARNING TO DRAW IN FLASH
5
In this segment you learn how to use the drawing tools in Flash. You'll be surprised
how Flash's drawing tools help you conceal the fact that you "can't draw."
You can create artwork for
your Flash movies using the drawing and painting tools. This lesson explains
basic drawing and painting techniques and lets you try the tools yourself.
STOP: To use this note , Please Open Flash 5> Click Help > Click Lessons> Click 02 Drawing
Drawing lines, rectangles,
and ovals
The Line, Rectangle, and Oval tools function as you would expect from using
other graphic programs.
1. Click the Oval tool. 
2. Drag in the work area to the right. Don't worry about the color or fill. The Color section of the toolbox lets you quickly choose fill and stroke colors for any shape you draw.
3. Make sure the Oval tool
is still selected, and then use the Stroke and Fill Color controls to try to
match the oval shown below.To use the Stroke or Fill Color modifiers, position
the pointer over the color chip and drag to highlight a color in the palette.
4. Drag in the work area to draw the oval.

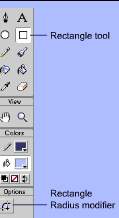 When
you select a tool, its modifiers appear in the Options section of the Toolbox.
The Line and Rectangle tools are very similar to the Oval tool, but they havedifferent
modifiers.
- Click the Rectangle tool and then click the Round Rectangle Radius modifier
to define a 20-point curve, similar to the one shown below. Drag in the work
area to draw the rectangle.
Using the Pencil tool
 The
Pencil tool is unique to Flash. You can use it to draw lines, shapes, or freehand
forms.
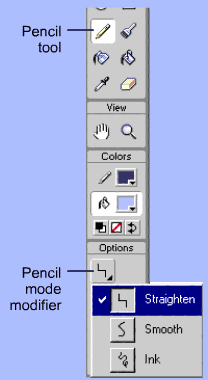
1. Click the Pencil tool and then choose Straighten from the Pencil Mode modifier.
2. Drag in the work area and try to draw a line similar to the one shown below. Notice how Flash straightens the lines.

4. Now choose Smooth from the Pencil Mode modifier. Try to draw a line similar. Notice how Flash smooths out the curves.
5. Choose Ink from the Pencil Mode modifier and draw the same line. Also try drawing a square or triangle. Notice how Flash makes fewer changes to the line, though it still smooths some of the curves.
Painting and filling
shapes
 Using
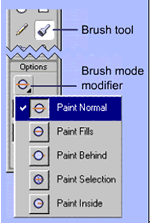
the Brush tool, you can create brushlike strokes as if you were painting.
- Click the Brush tool and then use the Brush Mode modifier to experiment with
different brush modes as you paint over the images in the work area.
Note that Paint Inside
paints the area in which you start a brush stroke. If you start painting an
empty area, no existing artwork
is affected.
You can use the Paint
Bucket tool to change the color of existing paint and to fill empty areas surrounded
by lines.
1. Click the Paint Bucket tool and then draw the square in the work area.
2. Choose Close Large Gaps from the Gap Size modifier.
3. Click inside the empty oval you draw before in the work area. Flash fills the area even though it isn't fully enclosed.
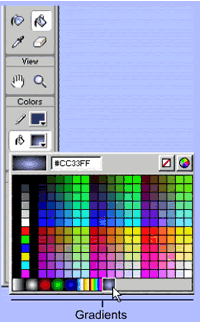 You
can fill an area with a gradient the same way you can with a solid color.
1. With the Paint Bucket tool still selected, click the Fill Color control and choose a gradient from the bottom of the Fill Color pop-up window.
2. Click inside the circle
in the work area. Flash provides several ways of editing gradients to create
a variety
of different effects.
Changing line properties
Using the Ink Bottle tool and Stroke panel, you can apply new line styles, thickness,
or color to lines.
1. Choose Windows > Panels > Stroke.
2. Change the line style to dashed, then change the thickness to 2, and set
the color to red.
3. Click the Ink Bottle tool.
4. From the tip of the Ink Bottle pointer, click the edge of the oval in the
work area.pointer, click the edge of the oval in the work area.Flash applies
the new line settings to the oval.
Erasing
 The
Eraser tool erases lines and fills. You can customize it to erase only
lines, only fills, only selected fills, or only the fill on which you started
erasing.
1. Click the Eraser tool,
choose Erase Normal from the Eraser Mode modifier, and erase part of one of
the lightbulbs.
2. Choose Erase Fills from the Eraser Mode modifier and erase part of the other
lightbulb.
3. Click the Faucet modifier and click a painted area in the lightbulb to immediately erase the fill. You can also erase lines with the faucet modifier.
4. Experiment with the other Eraser tool modifiers to see what they do.
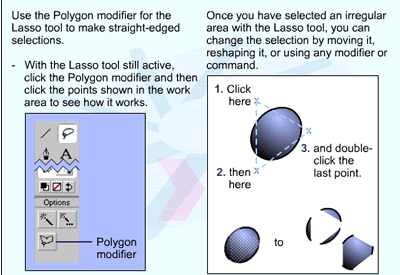
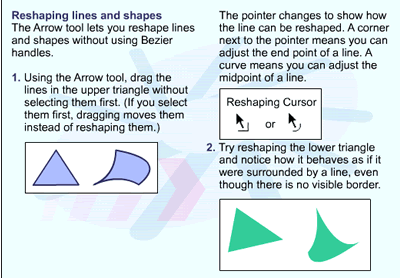
Selecting lines and shapes
 Before
making a change to a line or shape, you must select it using the Arrow or Lasso
tools.
1. Click the Arrow tool and click the center of the oval in the work area.The
fill of the shape becomes highlighted to show that it is selected.
2. Drag the selected shape to the right. Notice that only the fill moves with
the pointer.
3. Double-click the center
of the oval in the work area and drag it to the right.The border moves with
the shape because double-clicking a fill also selects any adjacent lines. Similarly,
double-clicking a line selects all adjacent lines.
 4.
First single-click and then double-click one of the connected lines of the shape
in the work area. Single-clicking selects only one line, but double-clicking
selects
all the connected lines.
5. Hold down Shift as you click to select additional lines without selecting
all the adjacent lines.
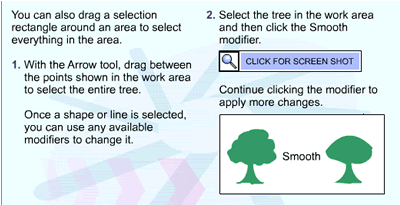
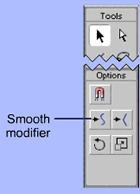
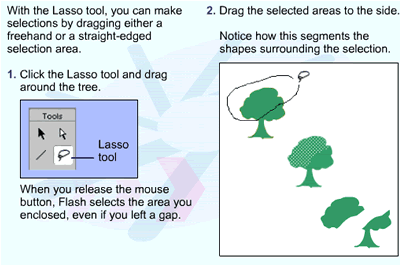
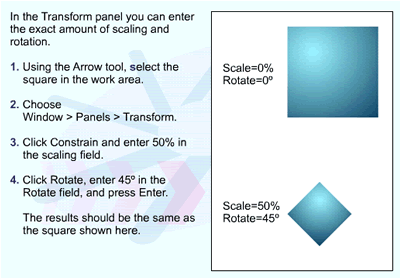
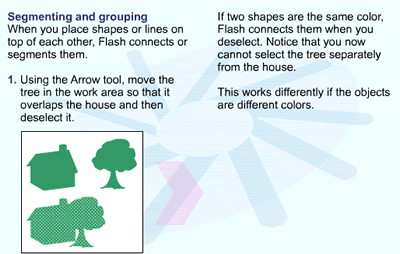
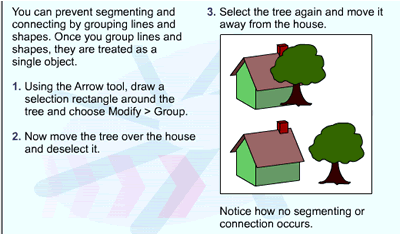
Now that you understand
basic drawing features in Flash, you're ready to continue learning about symbols
and instances in the next lesson.
SECTION ACTIVITIES
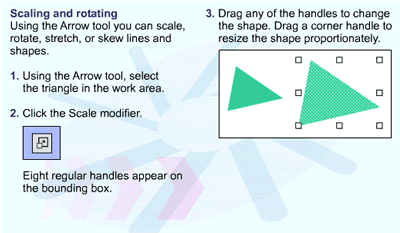
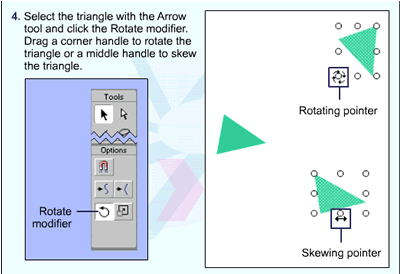
o Draw a fish, using the Pencil tool in the Straighten mode. It will be a very
angular, modern-art fish. Use the Arrow tool to reshape your fish, and then
select and rotate your fish.
o Draw a flag for the top of your mast, using the Pencil tool in Smooth mode.
o Using the tools of your choice from the Drawing toolbar, draw a simple shape,
such as a box, a kite, or a balloon. Fill the shape with color.
o Choose the Brush tool and experiment with other colors, brush shapes, and
sizes. Try the other paint modes. Use Undo to return to the brushstroke you
prefer.
| LESSON 1 | LESSON 2 | LESSON 3 | LESSON 4 | LESSON 5 | LESSON 6 | LESSON 7 |
|
Note taken from Using Flash 5 Help ©2002 Webmaster:Lina Aisah Rahmat. YPM Kuala Lumpur |