|
|
|
LESSON 3: LAYERS
| LESSON 1 | LESSON 2 | LESSON 3 | LESSON 4 | LESSON 5 | LESSON 6 | LESSON 7 |
OBJECTIVES
When you have finished this lesson, you will understand:
o layers and their basic properties
o how to create, name, hide, and lock layers
STOP: To use this note , Please Open Flash 5> Click Help > Click Lessons> Click 04 Layers
Understanding layers
You can think of layers as transparent sheets of acetate stacked on top of each
other. Where there is nothing on a layer, you can see through it to the layers
below.
Layers help you organize the artwork in a movie. You can draw and edit artwork
on one layer without affecting artwork on another layer.
Refer Lesson 4: Layers
 Selecting
layers
Drawing and editing occur on the active layer. To make a layer active, you select
it. The active layer is highlighted in the Timeline window and the pencil icon
indicates it can be edited. The three objects in the work area are each on a
separate layer.
1. Using the Arrow tool, select the triangle in the work area. Notice that the
Triangle layer becomes the active layer.
2. Select the Circle layer in the Timeline window.Notice that the circle is
selected in the work area.
 Changing
the order of layers
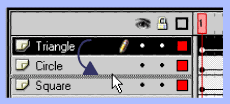
When images overlap, the contents of layers at the top of the Timeline window
appear in front of the contents of layers below them.
1. Using the Arrow tool, move the triangle over the circle in the work area.Notice
that the triangle covers the circle and that no connection or segmenting occurs,
even though the graphics are not groups or symbols.
Creating, naming, locking,
and hiding layers
In this scene the background is in separate layers so that you can draw in the
foreground.
![]() 1. Click the Water layer in the Timeline
window and click the Add Layer button at the bottom of the Timeline window.The
new layer appears above the Water layer and becomes the active layer.
1. Click the Water layer in the Timeline
window and click the Add Layer button at the bottom of the Timeline window.The
new layer appears above the Water layer and becomes the active layer.
2. Double-click the layer
name, type Fish as the new name for the layer, and press Enter (Windows). You
can begin drawing in the new layer immediately, but it is easier if you first
hide the Plants layer to reduce clutter on the Stage and lock the Water layer.
There are controls to the right of each layer name that let you lock or hide
the contents of the current layer.
 -
Click in the Lock column for the Water layer and in the Eye column for the Plants
layer. Icons appear next to the layer name to show which layers are locked or
hidden.
4. Click the Fish layer
in the Timeline window to make sure it is the active layer.
5. Use any of the drawing tools to draw in the Fish layer.
6. Click in the Eye column of the Plants layer to make it visible again. Objects placed in the Fish layer appear between the Water and Plant objects.
In a later lesson you will learn about the importance of layers in animation.
| LESSON 1 | LESSON 2 | LESSON 3 | LESSON 4 | LESSON 5 | LESSON 6 | LESSON 7 |
|
Note taken from Using Flash 5 Help ©2002 Webmaster:Lina Aisah Rahmat. YPM Kuala Lumpur |